This is for a scooter that I have playing with and modifying for way too long. It has gone through many different forms of which I will show some pictures of here. I tinkered with some pocketbikes for a little while but I always had a soft spot for upright scooters which is what lead me to this.
As of the making of this post it's finally running again with it being back at using a Cag engine of which I am experimenting with and with to use it as a test bed to set up an electronic ignition that can also be used on my other engines.
If someone could tell me if there is a way to have the attached images displayed in the main post instead of just at the bottom then that would be appreciated.
DISCLAIMER: Although I often come across like I know what I am doing and sometimes I even do, but instead I am often working with ideas that I think are right but can be potentially flawed. This is mostly the case with my custom engine work and while I have done a decent amount of reading there is sometimes false or gaps in my information. I am very open to suggestions and corrections in anything I state.
Now that aside what might be the single most drawn out worklog on here.
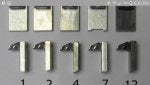
Pic 1 - Bare frame: This is what I started with, it's a childrens scooter, I believe it originally used 16" BMX wheels. I am not sure on the exact date but it was likely back in 2003 some time. At that point I had much more limited skills, knowledge and most of access to equipment.
Pic 2 - New wheels: Frame and forks modified to suit the pocketbike wheels.
Pic 3 - Frame work: More work to the frame to accommodate the cag engine
Pic 4 - Stage-1 Done: In a running form with either an original 40 or 49cc Cag engine. The exhaust was a modified OEM pipe.
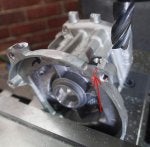
Pic 5 - Stage-2 Done: Custom built engine with 2-piece head, fat boy expansion pipe and a 14mm Dellorto rep carb.
As of the making of this post it's finally running again with it being back at using a Cag engine of which I am experimenting with and with to use it as a test bed to set up an electronic ignition that can also be used on my other engines.
If someone could tell me if there is a way to have the attached images displayed in the main post instead of just at the bottom then that would be appreciated.
DISCLAIMER: Although I often come across like I know what I am doing and sometimes I even do, but instead I am often working with ideas that I think are right but can be potentially flawed. This is mostly the case with my custom engine work and while I have done a decent amount of reading there is sometimes false or gaps in my information. I am very open to suggestions and corrections in anything I state.
Now that aside what might be the single most drawn out worklog on here.
Pic 1 - Bare frame: This is what I started with, it's a childrens scooter, I believe it originally used 16" BMX wheels. I am not sure on the exact date but it was likely back in 2003 some time. At that point I had much more limited skills, knowledge and most of access to equipment.
Pic 2 - New wheels: Frame and forks modified to suit the pocketbike wheels.
Pic 3 - Frame work: More work to the frame to accommodate the cag engine
Pic 4 - Stage-1 Done: In a running form with either an original 40 or 49cc Cag engine. The exhaust was a modified OEM pipe.
Pic 5 - Stage-2 Done: Custom built engine with 2-piece head, fat boy expansion pipe and a 14mm Dellorto rep carb.